Display
Published on 2021-03-05 in µGame S3.
The display can be considered the centerpiece of this device. It’s the largest and most expensive component. Pretty much everything else is decided by its choice — the size, the shape, the connections, etc. So let’s look closely what we have to choose from.
I’m a huge lover of pixel art, and I want the games for this console to have large, visible pixels. That means, on one hand, that we want a display with a large diagonal, but also, at the same time, we want low resolution, so that the displayed pixels are physically large. Low resolution is also important for two other reasons: the less data we have to send to the display, the faster we can do it and the more time the microcontroller has for other calculations, and it’s also much easier to learn about game development at low resolution, when you can actually see what is happening and can count pixels between things with your naked eye.
This is why for PewPew M4 I have settled on the 1.8” ST7735 display — with the resolution of 160x128, it’s the largest pixels you can have, and the $4-ish price is also very nice. Unfortunately, 1.8” is still a bit small. So what can we do?
What if we doubled the size of the pixels, and used a display with larger resolution? One immediate problem is that we would need to send four times more data per frame, on average. But what if we also switched from a 1-wire SPI to 8-wire parallel protocol? That’s eight times faster, so it should still give us two times speedup!
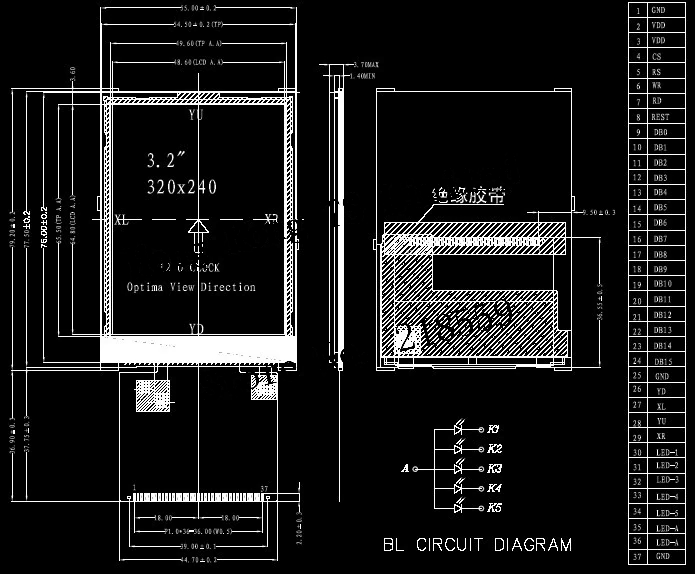
So what are our options for a doubled resolution? If we want our display to be cheap and easy to source, then we have basically two options: ILI9341 and ST7789V, which are both pretty much equivalent. They have 320x240 resolution, which is almost double of 160x128, except we lose those 16 pixels vertically. I think I can live with that. A little bit of browsing and looking around lets us conclude, that the largest ILI9341 display you can find is 3.2” diagonal — that is almost twice the size of the ST7735! As usual, there are variants with different interfaces, but considering we need parallel interface, I think the best for us is the Z320IT002 — a 3.2” display with 37 pins.

Now, that we know the dimensions of the display, we can say a little bit more about the device we want to build. It needs to be at least 8.5cm wide, in order for the functional part of the display to be centered on it. I could place the buttons on the sides, for a Switch- like landscape mode, or under the screen, for a more classic Gameboy- like portrait layout — both should be wide enough to hold the device comfortably. However, if I went for the landscape mode, then the device would be wider than 10cm, which pushes us into the area of expensive PCBs. Anything that fits in 10x10cm is relatively cheap these days (including laser-cutting of the acrylic case), but going over that makes the price grow four times larger. I could make it use several smaller PCBs, but that’s again increasing the price, as now you have to pay for two or more PCBs instead of just one. So let’s keep it within the 10x10cm limit. What about the height? If we look for a “standard” size that is close to the 8.5cm width, we will find the ISO B7 format, also known as ISO/IEC 7810 ID-3, at 12.5x8.8cm. But that takes us outside of our 10x10cm comfort zone. So why not just keep the minimal required 8.5cm width, and make the height the same? Turns our we should be able to fit everything in that form factor nicely, as long as the Raspberry Pi Pico goes on the back of the device.
By the way, that display is also available with a touch screen, but I think I’m going to ignore that option — it makes it a bit more expensive, makes the whole assembly thicker, and it would require me to rethink the whole case — I could no longer have transparent acrylic in front of the screen! Also, I think it would unnecessarily complicate the games, and shift the focus away from what I want to teach with this.
 deshipu.art